


RV Water System 101: From Newbie to Pro
Ever wondered how your RV's water system keeps you hydrated and clean on the road? Let's break it down! If you're new to RV life, the maze of tanks, pumps, and pipes might feel overwhelming - but trust me, mastering your RV water system for beginners is simpler than you think. As a seasoned RVer who's survived both icy winter leaks and mid-summer tank disasters, I'm here to share the essentials to stay safe, save money, and avoid literal messy situations.
Think of your RV's plumbing as its circulatory system: the fresh water tank is the heart, the RV water pump (your trusty guide to steady flow) keeps things moving, and the gray/black tanks? Well, they're the quite force handling the dirty work. Whether you're boondocking in the desert or hooked up at a campground, understanding RV plumbing basics isn't just about convenience, it's about protecting your health, your rig, and the environment. By the end of this guide, you'll know how to sanitize tanks like a pro, troubleshoot leaks before they flood your floor, and extend the life of your system. Ready to dive in?
Understanding Your RV's Water System
Your RV's water system is a self-contained network designed to supply clean water and manage waste efficiently. While it may seem complex at first, breaking it down into its three core components simplifies the learning curve:
Fresh Water Tank
The freshwater tank is designed to store clean, potable water for essential RV activities such as drinking, cooking, and washing.
It is typically constructed from non-toxic materials like polyethylene or ABS plastic to maintain water safety, these systems comprise several key components. A labeled exterior fill port, often marked "Fresh Water Connection," allows for easy water replenishment. To deliver water to faucets and appliances, a 12-volt water pump pressurizes the system, while a water heater provides hot water for showers and dishwashing.
Operation is straightforward: Users fill the tank by connecting a potable water hose to the fill port until it is full, then activate the water pump to pressurize the system. This enables water to flow throughout the tank for various camping uses.

Gray Water Tank
The gray water tank is designed to collect wastewater from sinks, showers, and appliances, excluding toilet waste.
These tanks are typically constructed from durable materials such as polyethylene or ABS plastic and incorporate several key components. Inlets provide connection points for wastewater drainage from sinks, showers, and appliances, while a vent allows gases to escape, preventing pressure build-up and unpleasant odors. A termination valve is integrated to control the release of the stored gray water during disposal.
The system collects wastewater from connected fixtures and stores it in the tank until it is ready to be emptied. When you reach a designated place for dumping, you can open the termination valve to gently let the water out.
Gray water tanks are mostly there to help you manage the wastewater used in your everyday activities like cooking and bathing, and they are crucial for helping to keep our environment clean by making sure wastewater is disposed of properly and responsibly.

Black Water Tank
Let's talk about the black water tank, which is designed to carefully hold the water and waste specifically from your toilet. Like the other tanks, it's usually made from strong materials like polyethylene or ABS plastic.
It has a special inlet that gently connects to your toilet, guiding any waste into the tank. And just like the gray water tank, there's a vent that helps release gases gently, so you don't have to worry about pressure or smells building up inside. A termination valve is also part of this system, allowing you to gently control when you want to empty the tank at the appropriate time.
It works by simply receiving the toilet waste and holding it securely in the tank until you're ready to dispose of it properly. When you reach a designated dump station, you can open the termination valve to gently release the black water in a controlled manner.
Black water tanks are primarily there to help manage human waste, which is really important for keeping things sanitary and comfortable in your RV. Because of what it holds, it's good to remember that it needs regular attention to help prevent any unwanted odors and keep everything nice and hygienic.

Why It Matters?
The RV water system is designed to provide you with the comforts of home while on the road, managing water from when it enters your RV to when it leaves.
Both the fresh water tank and the gray/black water tanks play vital roles: the fresh water tank supplies water for your needs, while the gray and black tanks manage wastewater responsibly during travel.
To understand how these systems work effectively, let's now explore the specific components that make up each of these water systems, allowing them to function seamlessly.
Safe Drinking & Living in RV
Explore RV Fresh Water System
Key Components of the RV Fresh Water System
The RV fresh water system is fundamental to safe and comfortable living on the road, ensuring access to potable water for drinking, cooking, and cleaning. At its heart lies the fresh water tank, sized according to the RV, capable of holding between 20 and 100 gallons of water. Unlike a house, your sinks and showers rely entirely on the pump when not connected to city water. This system effectively brings the conveniences of home into the RV by supplying water to sinks, showers, and even toilets through the use of a pump, enabling off-grid living and comfortable travels.
The system's functionality relies on several interconnected components working in concert.
- A dedicated, drinking-safe water hose (usually white or blue) is the starting point, it connects to campground hookups or external water sources and is used to fill the fresh water tank from an external source.
- Once filled, an RV water pump becomes crucial and draws water from the fresh tank to faucets, showers, and toilets when you're off-grid. It activates automatically when you turn on a tap.
- To maintain water purity, an RV water filter is integrated to remove sediment, chlorine, and contaminants from the water before it reaches faucets and appliances.
- Finally, an RV water pressure regulator plays a protective role, safeguarding the system from potentially damaging high water pressure from external water sources and ensuring consistent and safe water delivery.
These components work together like a relay team: The hose fills the tank, the pump delivers water on demand, the filter cleans it, and the regulator ensures safe pressure.
Maintenance Tips
- Sanitization: Mix 1/4 cup unscented bleach per 15 gallons of water. Fill the tank, run all faucets until you smell bleach, let sit for 12 hours, then flush thoroughly. Repeat every 3-6 months or if water tastes/smells odd.
- Winterizing: Drain the tank and pipes completely before freezing temperatures. Use RV antifreeze (non-toxic propylene glycol) in drains and toilets to prevent cracks.
The Heart of the System: RV Water Pump
For RV adventurers, the water pump is the heart of the water system that delivers the convenience of running water to sinks, showers, and appliances. Let's dive into how it works, the types available, and how to keep it in top shape.
What Does an RV Water Pump Do?
The RV water pump pressurizes your freshwater system, drawing water from the tank and pushing it through pipes to faucets and fixtures. Powered by your RV's 12-volt electrical system, it activates automatically via a pressure switch when you open a tap. This ensures a steady flow, mimicking a traditional home water system even when you're off-grid.

Types of RV Water Pumps: Diaphragm vs. Centrifugal
RV water systems require reliability, compactness, and quiet operation, while also handling water pressure fluctuations, such as frequent start-stops during water usage.
- Diaphragm pumps excel in their self-priming capabilities, dry-run tolerance, and ability to handle pulsating flow. In contrast, centrifugal pumps might be more suitable for high-flow, low-viscosity applications like municipal water supply. However, RVs need pumps that are compact, durable, and capable of handling intermittent use.
-
The quiet operation of diaphragm pumps is particularly crucial in the confined spaces of RVs, preventing noise from disrupting the living experience. Furthermore, their compact design is better suited for the limited installation space in RVs. Centrifugal pumps may not be ideal for RVs because they typically require continuous operation and cannot run dry. RV water systems are prone to air ingress, such as when the water tank is empty, which can damage centrifugal pumps. Diaphragm pumps' self-priming and dry-run capabilities are better suited for these situations.

-
Additionally, centrifugal pumps experience reduced efficiency at low flow rates, while RV usage is often intermittent, requiring pumps to respond quickly to start-stops. The pulsating flow of diaphragm pumps can be smoothed out with an accumulator tank. Therefore, in summary, diaphragm pumps are more suitable for use in RVs.

RV Water Pump Maintenance Tips
Extend your pump's lifespan with these steps:
- Check for Leaks: Inspect connections monthly and tighten fittings or replace cracked lines.
- Winterize: Drain the pump and lines before freezing temps. Use RV antifreeze to prevent damage.
- Avoid Dry Runs: Don't let the pump operate without water too long - it can overheat. Always monitor tank levels.
- Clean the Inlet Screen: Sediment buildup? Flush the pump's filter screen annually.
RV Water Pump Troubleshooting Quick Guide
Low Pressure? Check for clogs, leaks, or a failing pressure switch.
Pump Cycles Randomly? Likely an air leak in the suction line.
Unusual Noise? Airlocks or debris in the system. Try bleeding the lines.
Pro Tip: Keep a spare pump diaphragm or cartridge on hand for emergencies.
Product Recommend: Kohree Low Noise & Stable Water Pumps
-
For the 12V 3.5 GPM Pump
Hey folks, if you're just dipping your toes into RV life, this 3.5 GPM water pump is your new best buddy. It's got enough juice to handle showers and dishes, or fill up your coffee pot without breaking a sweat - 3.5 gallons a minute.
Runs smooth at 55 PSI and sips power at just 7.0 amps, so it won't drain your battery. Plus, it's built tough: even if it accidentally runs dry for a second (we've all been there), it won't fry itself. Thermal protection? Check.
Works for RVs, boats, caravans, and even watering your backyard tomatoes. A no-brainer for newbies who want reliability without the fancy fuss.

-
For the 12V 5.5 GPM Pump
Need a firehose-like flow for back-to-back showers or blasting mud off your rig? This 5.5 GPM fresh water pump's got your back.
Upgraded pressure guts push 5.5 gallons a minute at 55 PSI, and it's still energy-sippin' at 8.0 amps. But here's the kicker: it's stealthy-quiet (45dB, quieter than your AC), so your nap - or your pup's - won't get wrecked. It also has thermal protection and runs dry for five minutes, so you don't need to worry too much.
Perfect for RVers who live that "more water, more fun" life but still wanna keep things chill. CE-certified, so it's legit for boats, yachts, or hosing down your driveway.

-
For the 12V 7.0 GPM Pump
If you're tired of wimpy showers and finicky faucets in your rig, this 12V 7.0 GPM fresh water pump is about to become your new bestie.
When you take a shower in your RV without the water pressure dropping mid-rinse, or quickly filling a cooking pot while your campsite neighbor's pump still struggles to prime. With 70 PSI pressure and 7 gallons per minute, it delivers consistent flow - whether you're washing dishes after a group meal or rinsing sand off gear at the beach.
Whether you're troubleshooting an issue or shopping for the best RV water pump, understanding these basics ensures you'll stay hydrated and hassle-free on the road. Prioritize quiet operation or easy maintenance.

Fresh Water Hose for Safe Drinking
In an RV water system, the water pump serves as the core, providing the power for water flow. Similarly, water hoses are the optimal tools for water transmission. Proper hose selection and maintenance directly impact system efficiency, ensuring safe drinking water delivery while preventing cross-contamination between clean and wastewater systems.

How to Choose a Safety RV Drinking Water Hose?
- Material Safety: Opt for food-grade PVC or rubber hoses explicitly labeled as "drinking-safe." Avoid standard garden hoses, which may leach hazardous chemicals (e.g., lead, BPA, phthalates). Always reject hoses marked "not for drinking" or containing phthalates.
-
Color Identification System: While hose color doesn't guarantee safety, it serves as a practical identification tool:
White/Blue hoses: Typically certified for potable water use.
Green/Yellow hoses: Generally reserved for sewage or gray water applications (avoid for drinking water).
- Certification Requirements: Prioritize hoses meeting NSF/ANSI 61 standards or FDA compliance, as these certifications verify material safety for human consumption.
-
Critical Selection Criteria: When choosing an RV water hose, ensure it:
Carries explicit potable water certification.
Demonstrates leak-resistant construction.
Withstands extreme temperatures and pressure fluctuations.
- Safety Warning: Never substitute garden hoses for drinking water applications. These unrated hoses pose contamination risks through chemical leaching and microbial growth.
How to Use Your Drinking Water Hose Correctly?
Avoid These Mistakes:
Non-potable hoses: Replace immediately if labeled "not for drinking."
Cross-contamination: Never use the same hose for freshwater and sewage.
Leaving hoses pressurized: Disconnect from spigots when not in use to prevent bursts.
Ignoring UV damage: Replace cracked/discolored hoses (sun exposure degrades materials).
Pro Tips for Setup:
Use a hose washer (rubber gasket) to prevent leaks at connections. Install quick-connect fittings for a faster, tool-free setup.
Avoid kinks: Coil loosely to maintain water flow and prevent cracks. Carry two hoses (10ft and 25ft) to adapt to campground spigot distances.
Maintenance Tips to Extend Hose Lifespan
Winter Care: Drain completely after each trip to prevent freezing and bursting.
Storage: Hang vertically or coil in a ventilated compartment to avoid mold/mildew.
Cleaning: Flush the inner hose monthly with a 1:1 vinegar-water solution to remove biofilm (slimy bacteria buildup).
Potential Risks Without Cleaning it Out
Health risks from chemical leaching (e.g., lead poisoning).
Hose failure (bursts, leaks) due to UV damage or freezing.
Contamination from mold or sewage backup.
Recommended Long-term Use RV Water Hose
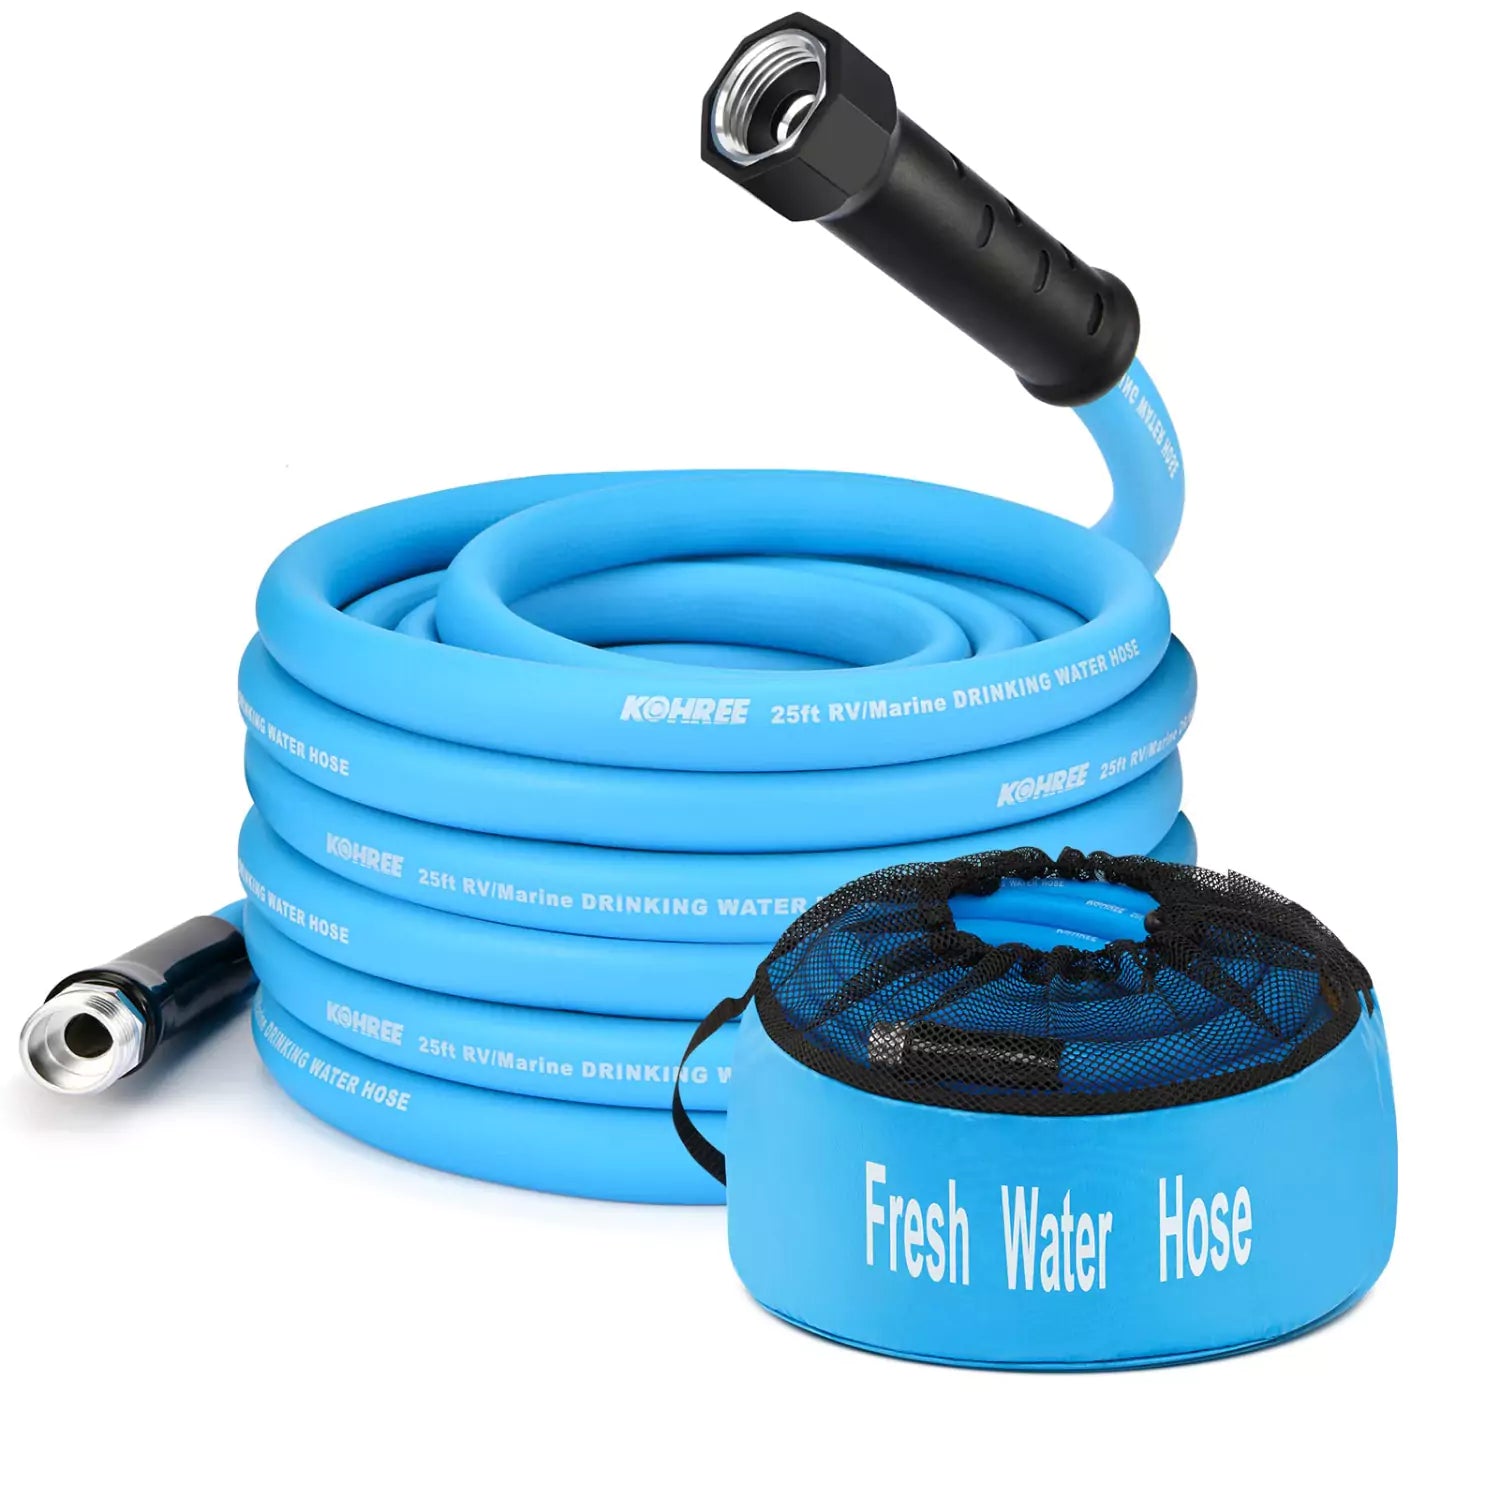
If you've ever wrestled with a cheap hose that kinks, leaks, or just flat-out ruins your RV water setup, listen up. The Kohree RV water hose is like that trusty tool you never knew you needed - until it saves your weekend.
Let's cut to the chase: Durability matters. This hose's 3-layer heavy-duty rubber can handle gravel roads, UV rays, and freezing temps without cracking or splitting. Picture this: You're at a dusty campsite, hooking up to a rusty spigot. With most hoses, you'd worry about leaks or bursts. But this one? Its premium aluminum fittings lock tight, so you won't waste water (or your patience) mopping up puddles.
- No more hose headaches: Tangle-free design means you're not fighting coils like a rodeo clown. Unroll it, plug it in, and get water flowing fast.
- Lightweight but tough: It's easy to maneuver around your rig's tight corners, yet sturdy enough to survive being run over by your tow vehicle (we've all been there).
- Stores like a dream: Roll it up in seconds, toss it in the included storage bag, and say goodbye to that messy hose pile in your compartment.
- Safe drinking water? Non-negotiable: The CA65 certification means no plastic taste or sketchy chemicals - just clean water for drinks, showers, or filling the dog's bowl. And with universal 3/4" threads, it hooks up to any faucet or reel without fuss. No adapters, no swearing.
This isn't a "luxury" hose. It's the workhorse that keeps your RV life hassle-free. Spend less time fixing leaks and more time enjoying the view. Still in doubt? Don't just take our word, take a look at Adventure Rock's review of our freshwater hose!
By prioritizing certified food-grade materials, proper storage, and regular cleaning, you ensure safe drinking water and extend your water hose's lifespan. Always inspect hoses for wear and replace them every 2 - 3 years or sooner if damaged.
Clean Water Starts Here: RV Water Filters
An RV water filter is a critical component of your caravan's water system, designed to remove contaminants like sediment, chlorine, heavy metals, and bacteria. It acts as a barrier between your freshwater source and your taps, ensuring safe drinking water while protecting your plumbing from debris buildup. Filters vary by type (e.g., inline sediment filters, multi-stage and carbon filters) and are essential for maintaining water quality on the road.

Inline Filters: Installed directly in the freshwater hose line between the water source and RV.
Advantages: Cost-effective, simple cartridge replacement.
Best for: Basic particulate removal (sand, rust) and chlorine reduction
Whole-System Filters: Permanently integrated into RV plumbing (typically near water pump/tank)
Advantages: Removes 99% of contaminants including heavy metals, microorganisms, and VOCs
Best for: Multi-stage filtration (e.g., sediment → activated carbon → UV sterilization)
Replacement Tips
It is generally recommended to replace the water filter every 3 to 6 months (depending on usage frequency). However, if you experience any of the following situations, it indicates that you need to replace the water filter cartridge as soon as possible to prevent water contamination:
- 50% flow rate reduction (indicates sediment buildup).
- Noticeable taste/odor changes (signals carbon filter exhaustion).
- Extended stays (>2 weeks) at high-TDS (>500 ppm) locations (e.g., sulfur-rich wells).
Choosing the Right Filter
Water filtration is a highly scientific and meticulous subject, and a single paragraph is insufficient to cover it comprehensively. Therefore, I will only list some simple water filter cartridge selection options here to help most RV enthusiasts quickly and cost-effectively access water that is as clean as possible.
| Filter type | Key functions | Target contaminants |
| Sediment | Mechanical barrier | Dirt, rust flakes, microplastics |
| Activated carbon | Chemical adsorption | Chlorine, pesticides, THMs |
| Advanced systems | NSF-certified specialized filtration* | Lead, bacteria, pharmaceutical residues |
*Prioritize NSF/ANSI 42 (taste/odor) or 53 (health contaminants) certifications for verified performance.
Critical Note: Always pair your filter system with regular water testing (especially when boondocking) to ensure optimal filtration capacity.
How to Use RV Water Filters & Hoses
It is crucial to consistently pair filters with NSF 61-certified drinking water hoses, adhering to established material safety standards. Specifically, filters should be positioned upstream of the water pump, ideally within three feet of the freshwater inlet, and system pressure should be maintained between 40-60 PSI using adjustable regulators to prevent both filter membrane rupture and hose joint failures.
Final Pre-Trip Checklist
☑️ Test water quality with a portable testing kit in remote camping areas.
☑️ Store hoses and filters completely dry to inhibit mold growth.
☑️ Inspect seals and connections for wear before each journey.
Affordable & Functional RV Water Filter Recommend
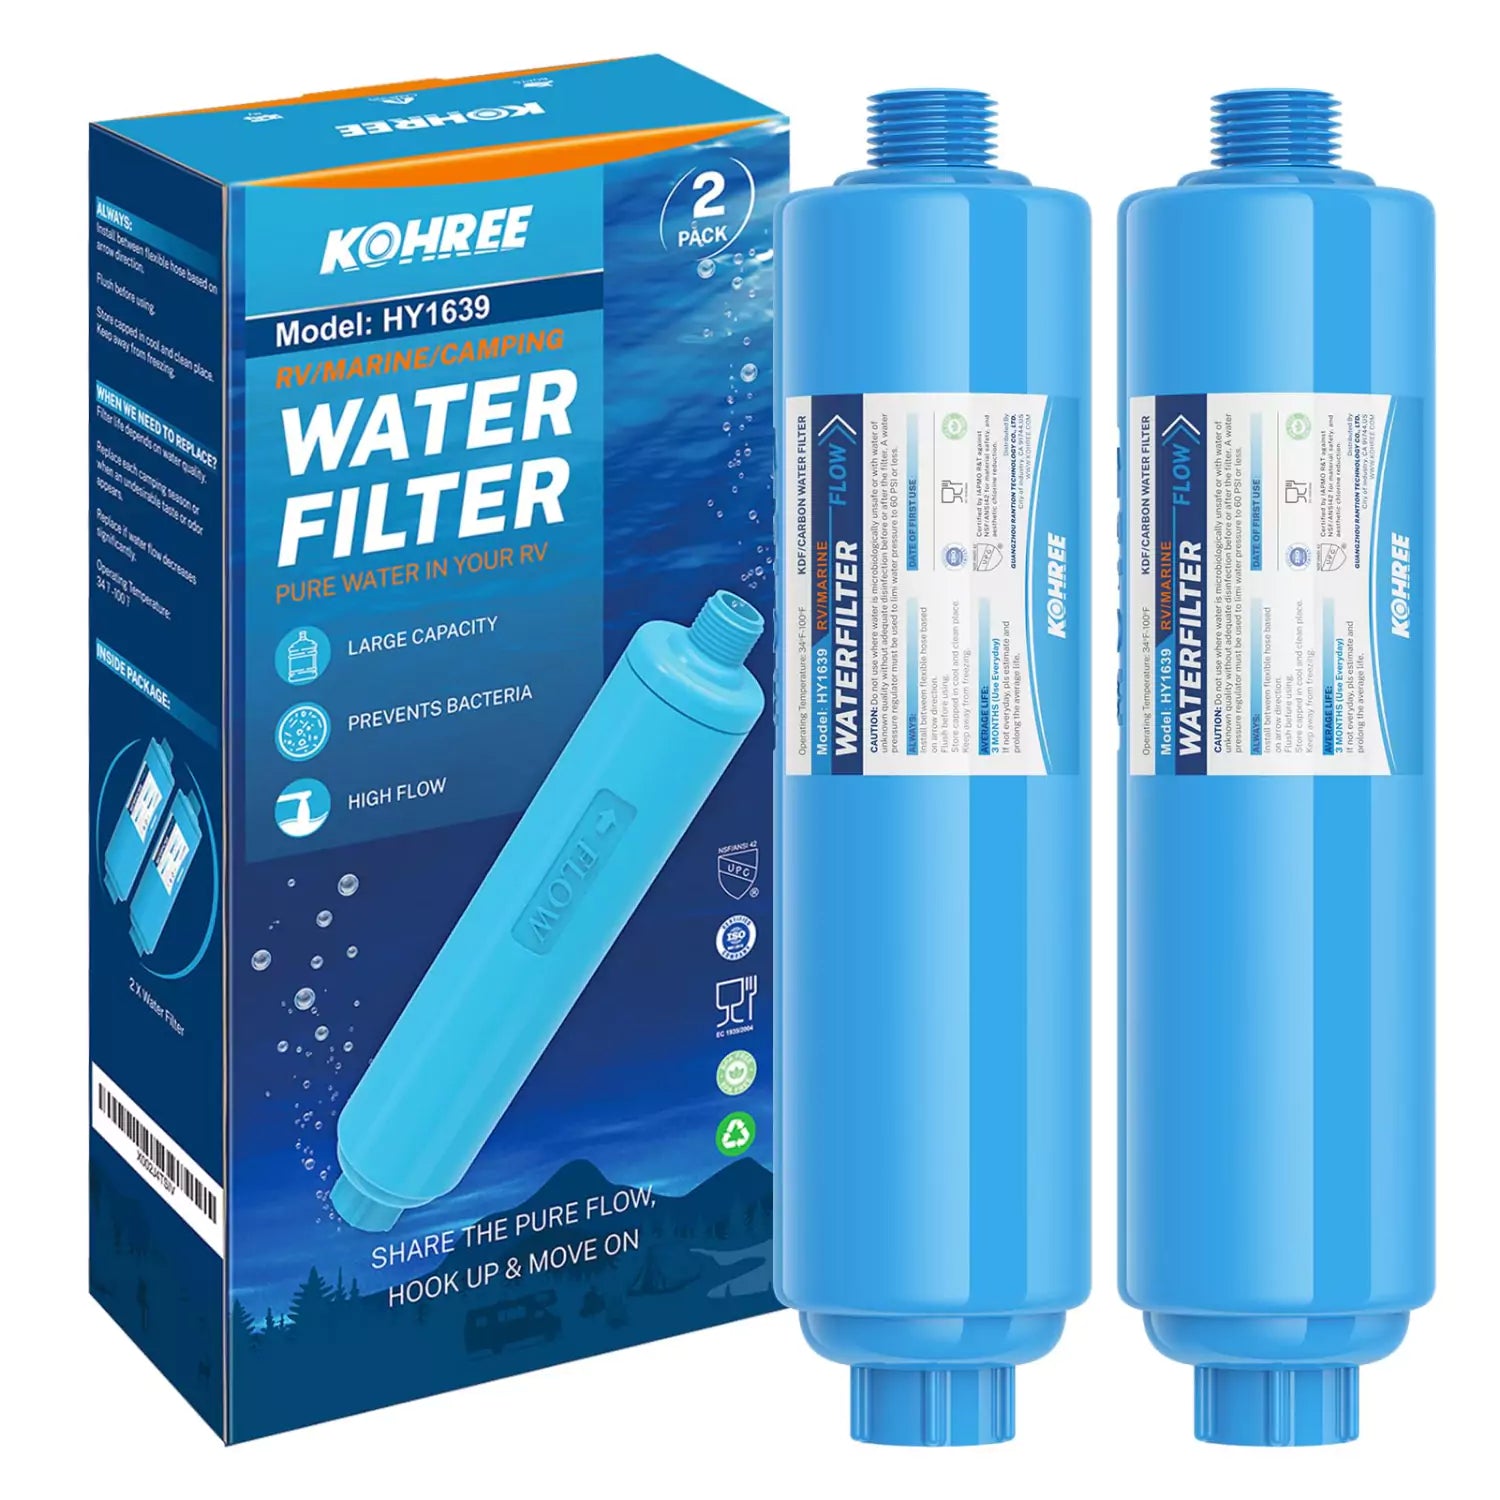
Let's talk about something we all hate: sketchy campground water that tastes like a swimming pool or leaves your coffee tasting like pennies. This Kohree RV water inline filter fixes that - No other expensive or complicated options, just straight-up clean water you can trust. Here's why it's a no-brainer for your rig:
- Certified safe, no guesswork: NSF 42 and BPA-Free certified. Translation? It zaps 97% of chlorine, kills funky tastes, and keeps your water safe for drinking, cooking, or even showering. No more side-eyeing that murky campsite spigot.
- Built like a tank: Thick food-grade plastic shell - tested to handle rough roads and freezing temps. One filter lasts all season (up to 1,057 gallons!). Just swap it every 3-6 months, and you're golden.
- No waiting around: 0.5 GPM flow means water's ready when you are. Fill your tanks fast, rinse off muddy boots, or brew coffee without staring at a trickle.
- Fine enough to catch the gunk: 20-micron filter + 5-layer tech. Think of it like a bouncer for your water - stops sediment, rust, and that "swampy hose" smell.
- Stop worrying about weird water and start enjoying your trip. Toss it in your rig, forget about it, and let it do the dirty work.

By investing in the right filter, adhering to maintenance schedules, and preparing for seasonal changes, you'll ensure safe, great-tasting water and protect your RV's plumbing system. Happy healthy travels!
Pressure Control: The Role of RV Water Pressure Regulator
What is an RV Water Pressure Regulator?
An RV water pressure regulator is a device installed between the campground spigot and your freshwater hose. It limits incoming water pressure to a safe range (40-60 PSI), protecting your hoses, filters, and plumbing from damage caused by high-pressure surges common at campgrounds.

Why You Need One Before Connect to Water Source?
- Prevents burst hoses or cracked fittings due to excessive pressure.
- Safeguards water filters from premature clogging or failure.
- Avoids costly leaks in your RV's internal plumbing system.
How a Water Pressure Regulator Works?
Installation: Attach the regulator directly to the campground spigot before connecting your freshwater hose and filter.
Pressure Adjustment: Most RV water pressure regulators are pre-set to 40-60 PSI and do not require manual adjustment. Of course, you can also use adjustable ones to customize the water pressure to your needs. If your regulator lacks a built-in display, use an inline pressure gauge to verify the PSI.
Pro Tips for Using an RV Water Regulator
Always use one: Even if a campground claims to have "low pressure," surges can occur.
Carry a spare: Regulators can wear out over time, keep a backup in your toolkit.
Pair with a filter: Place the regulator before the filter to reduce stress on the filter.
Check for leaks: Use Teflon tape on threaded connections to ensure a tight seal.
How to Connect RV Water Pressure Regulator?
- Attach regulator to spigot.
- Connect a hose and filter downstream.
- Open the spigot slowly to avoid pressure spikes.
Why This Matters?
Water pressure at popular campgrounds often exceeds 80-150 PSI, posing a significant risk to RV owners. This elevated pressure can lead to multiple equipment failures through mechanical stress and system overload. Prolonged exposure to such pressure levels can destroy your freshwater hose (resulting in bursts and leaks), overwhelm filters reduce their lifespan, and damage sinks, showers, and water heaters within your RV.
Premium Reliable Kohree Water Pressure Regulator Recommend
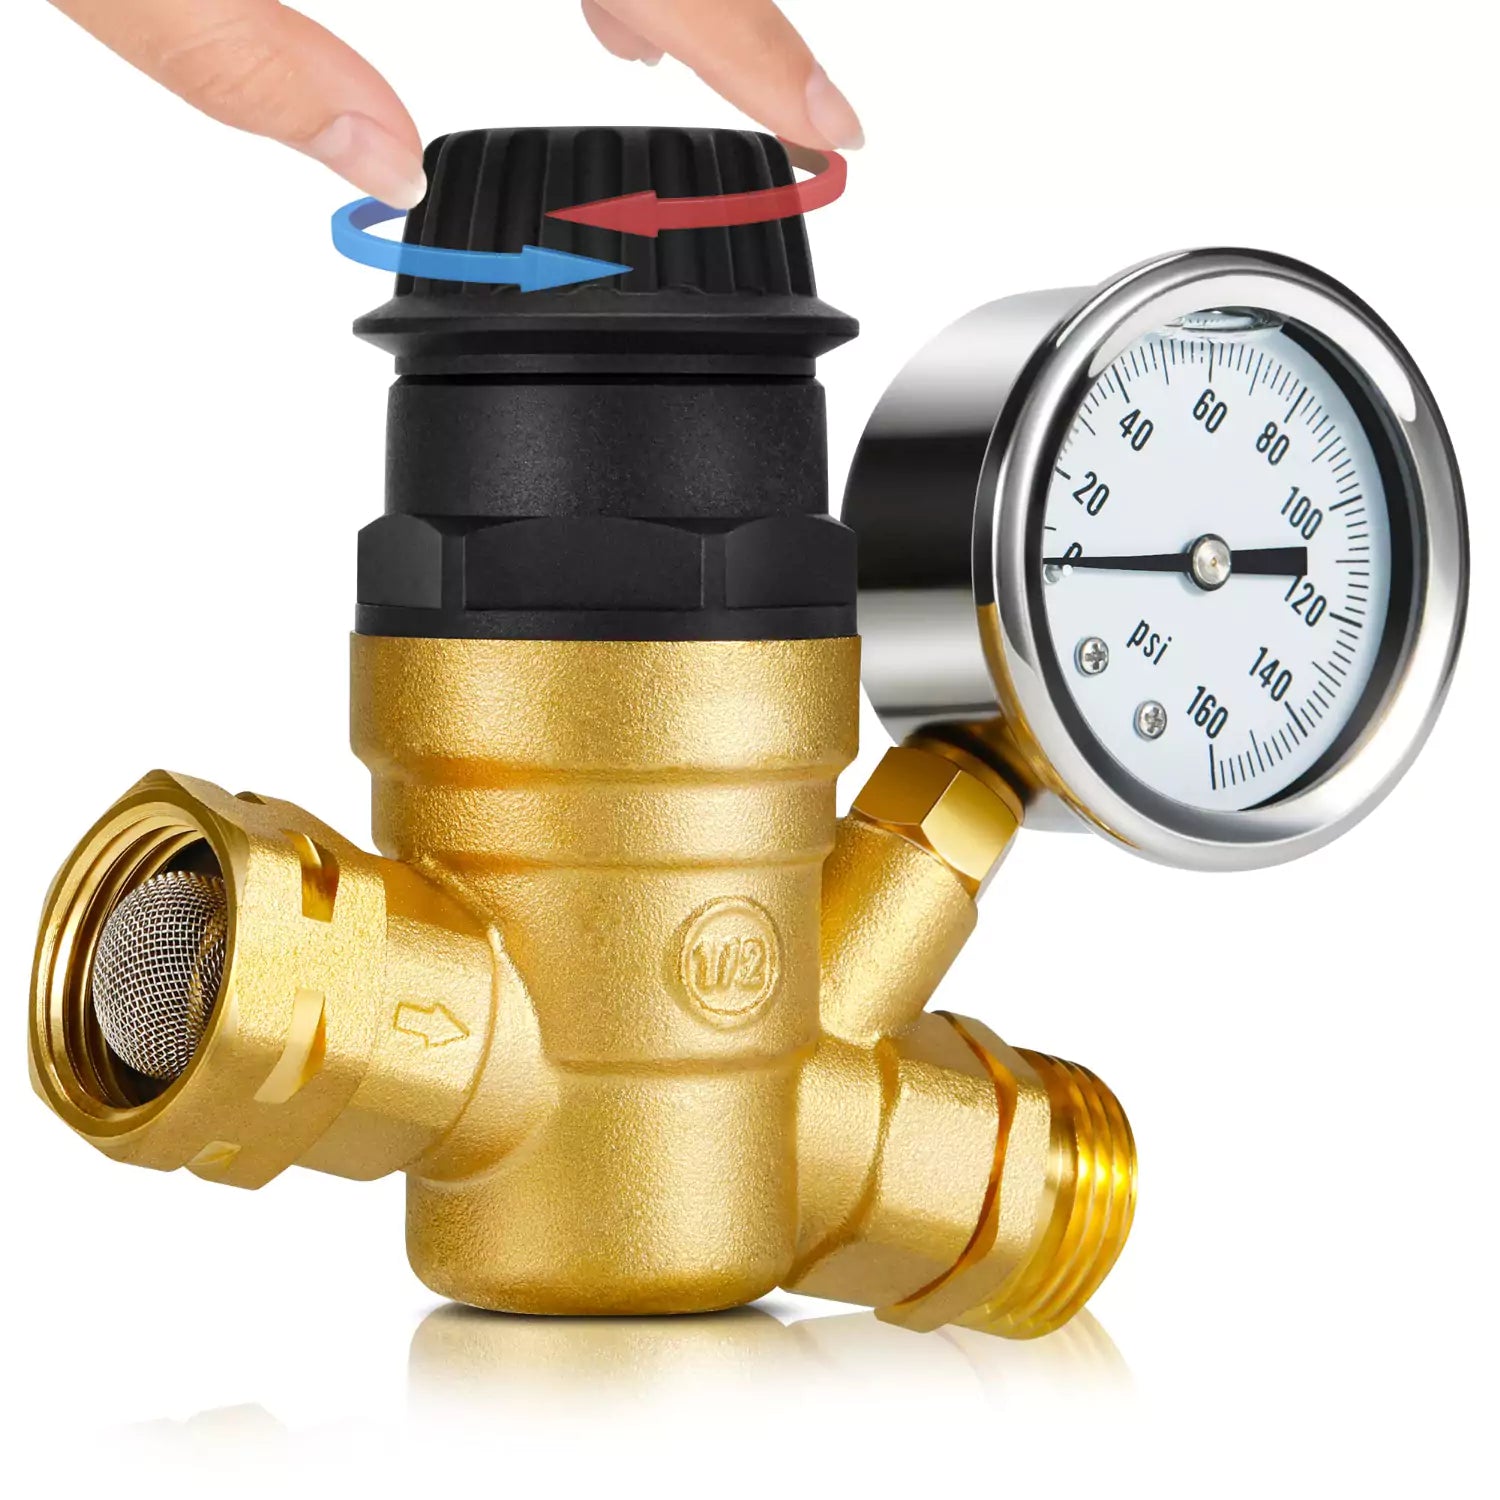
That time the campground water pressure spiked and nearly blew your hose? This 160 PSI Kohree adjustable water pressure regulator is like a bouncer for your RV - keeps the chaos out. Why this little gadget deserves a spot in your rig:
- Tool-free adjustments: No digging for wrenches. Just pull up the knob and twist it by hand to dial in the perfect pressure. Need more oomph for a shower? Turn clockwise. Want a gentle flow for washing dishes? Counterclockwise. Done.
- Lead-free and worry-free: Made with C46500 brass (way under NSF's strict 0.25% lead limit), so it's safe for your family, pets, or filling that coffee pot. No weird metallic tastes, just clean water.
- Built-in pressure gauge: No guessing. See exactly what's happening with the 0-160 PSI gauge. Factory-set to 45 PSI, but tweak it for gardens, home plumbing, or stubborn campground spigots.
- Fits anything with a hose: Have 3/4" garden hose threads on both ends? Check. Works with NH-standard hoses, RVs, trailers, and even your backyard sprinkler.
- Double-layer filter: Two screens at the inlet catch dirt, sand, and gunk before they clog your pipes. Perfect for sketchy water sources or old campground hookups.

Protect your RV's plumbing, save water, and skip the unstable campground water pressure. Set it once, forget it, and get back to enjoying the view.
What you should notice is prioritize adjustable or pre-set (40-60 PSI) models with brass fittings for durability. By using a regulator, you ensure consistent, safe pressure, extending the life of your entire water system.
Prevent Waste Water System Odor & Leaks in RV
RV Wastewater Management Gray Water Tank
The gray water tank stores wastewater from sinks, showers, and appliances (non-toilet sources). Unlike the black water tank (toilet waste), gray water is non-toxic but since it is not clean water, you still require responsible disposal to minimize environmental impact.

Capacity: Typically holds 30 - 60 gallons (smaller than freshwater tanks).
Usage: Fills faster than you think. You know how we love our home-cooked meals on the road, right? Well, just washing those dishes after three square meals for a family of four, you're looking at draining 10 to 20 gallons into that tank. And don't even get me started on our luxurious RV showers - five minutes of rinse and relaxation? That's about 7 to 10 gallons of water in your gray water system. And if you've got one of those portable washing machines, oh, it's a water mover, easily adding 15 gallons or more per cycle.
Maintenance Tips
Use biodegradable soaps: Reduces harm to ecosystems when dumping
Install tank sensors: Monitor levels to avoid overflows (common in older RVs without built-in sensors).
Prevent odors: Flush the tank with clean water after emptying. Add gray water tank treatment monthly.
Avoid food waste: Use sink strainers to keep grease and particles out of the tank.
Why This Matters?
RV integrity: Overflows damage undercarriage components and attract pests. Compliance: Many campgrounds fine improper gray water disposal (e.g., dumping on the ground).
Pro Tips
Dump order: Always empty the black water tank first, followed by the gray water tank. The gray water helps flush residual waste from the sewer hose.
Carry a backup hose: I'm sure you wouldn't want to drink your bathwater, so dedicate one hose exclusively to wastewater to avoid cross-contamination.
Winterize: Drain the gray water tank completely in freezing temps to prevent cracks.
Final Checklist
☑️ Check tank levels daily with a sensor or manual gauge.
☑️ Use eco-friendly products to keep tanks and nature clean.
☑️ Always dump at approved stations.
By managing your gray water tank thoughtfully, you'll avoid messes, protect the environment, and keep your RV running smoothly.
Black Water Tank
The black water tank stores waste and water from your RV toilet. It is designed to safely contain human waste and toilet paper until it can be properly disposed of at a designated dump station. Proper management is critical for hygiene, odor control, and environmental protection.
Key Things to Know About Your Tank
Sealed Tight: These tanks are built with a valve that's meant to be sealed shut. This is your first line of defense against leaks and those unpleasant odors making their way into your living space. Keep that valve closed unless you're actively dumping!
Capacity Considerations: Black water tanks are typically smaller than gray water tanks, usually holding anywhere from 15 to 40 gallons. Why smaller? Waste is denser, and honestly, you're not going to want a massive tank of that hanging around.
Needs a Little Chemical Help: Unlike your home toilet, RV black tanks need a bit of chemical treatment. These treatments are specially formulated to help break down solids and keep those odors under control. Think of it like adding a little something extra to help things along and keep it smelling… well, less offensive.
Practical Points for Using Your Black Water Tank
Toilet Paper for RV: This is important: use RV-friendly toilet paper. Regular household paper can cause clogs because it doesn't break down quickly enough in the tank. Want to check if yours is RV-friendly? Put a piece in a jar of water, give it a shake, and see if it starts to fall apart within an hour. If it does, you're good to go. If not, switch it out!
Treat it Right with Chemicals: Regularly use RV tank treatments. Products like Thetford Aqua-Kem are designed to break down waste and knock out those odors. If you're camping in more natural or sensitive areas, you might want to look into eco-friendly enzyme-based treatments - better for the environment.
Rinsing is Your Friend: After you dump, give your tank a good rinse. You can get a tank rinser attachment that connects to your hose and helps flush out any leftover residue. And once a year, it's a good idea to sanitize the tank. A simple bleach solution - about 1 cup of bleach for every 15 gallons of tank capacity - will do the trick.
Monitor Those Sensors: RV tank sensors can sometimes be a bit optimistic, especially black tank sensors. Clogs on the sensor probes are common and can give you false "full" readings. If you suspect this is happening, a tank wand can help clean those probes. But honestly, sometimes experience and knowing your usage patterns are the best gauge.
Why Handling It Matters?
Health First: Improperly handled black water can expose you to harmful bacteria such as coli and other nasties. Keeping things clean is essential for your health.
Odor Control: A neglected black tank will release methane gas and some seriously foul smells. Nobody wants that in their RV. Proper management keeps your rig smelling fresh(er).
Stay Legal and Avoid Fines: Dumping black water just anywhere is a big no-no. It's illegal and can come with hefty fines. Always use approved dump stations.
Final Essential Checklist Before You Roll
☑️ Tank Level Check: Get in the habit of checking your black tank levels before you set off on each trip and then every 2-3 days of use, or more frequently if you're using the facilities heavily.
☑️ Gloves and Disinfectant Are Your Friends: Always wear disposable gloves when handling the sewer hose and dump station connections. Keep disinfectant wipes handy to clean surfaces afterward. Hygiene, hygiene, hygiene.
☑️ Never Leave That Black Tank Valve Open at the Campsite! This is a rookie mistake that causes solid waste to solidify and build up ("pyramid") in your tank. Always keep the black tank valve closed unless you are actively dumping.
By maintaining your black water tank diligently, you'll avoid disasters, keep your RV odor-free, and protect the environment. Next, let's explore the essential tools for managing black water tank waste disposal.
Sewer Hose Support: Keeping Your RV Waste System Flowing
Basically, sewer hose support is all about holding that hose in place so gravity can do its job properly. It creates a gentle downhill slope from your RV's tank outlet to the dump station inlet. Why is this important? Well, proper support helps:
-
Preventing Wear and Contamination
Ground Protection: By lifting the hose off the ground, the support reduces friction with rocks, gravel, or rough surfaces, preventing punctures or abrasions.
Hygiene: Keeping the hose elevated minimizes contact with dirt, debris, or standing water, reducing the risk of contamination when handling the hose later.
-
Ensuring Proper Drainage
Gravity Assistance: The support's sloped design creates a downward gradient, allowing waste to flow smoothly from the RV's tanks to the dump station. Without this slope, liquids may stagnate or flow inefficiently, leading to clogs or incomplete draining.
- Avoiding Sagging: A sagging hose can trap waste residue, increasing odors and the risk of blockages. The support maintains a straight, angled path for optimal flow.
What Kind of Sewer Hose Support You Can Consider?
There are a few ways to go here, from simple to a bit more fancy. Think of it like choosing between a bicycle and a motorbike - both get you there, but one is a bit more robust.
Adjustable Folding Supports: These are probably the most common and kinda like the Swiss Army knife of supports. They usually fold up for easy storage and adjust in length. They're pretty good all-around, and a solid starting point.

Fixed Rigid Supports: These are more solid, often made of heavier-duty materials. Think of them as the pickup truck of supports - reliable and strong. They might be a bit less compact to store, but they offer really consistent support, especially on uneven ground.

DIY Options: Keep it Simple (Sometimes): Some folks get creative with DIY - maybe using PVC pipes or even foam blocks to lift the hose. These can work in a pinch, especially if you're handy. But, just like building your bookshelf versus buying one from IKEA, DIY can be time-consuming and might not always be as reliable as something designed for the job.
Simple Maintenance to Keep Your Sewage Hose Support in Shape
Maintenance here is pretty straightforward, luckily:
Clean It Up: After you're done dumping and packing up, give your support a quick rinse and maybe a wipe down, especially if it got a bit splashy. Just like cleaning up your tools after any job.
Store it Smart: When you're not using it, store your support out of direct sunlight if possible. UV rays can break down some materials over time. Storing it in a storage bay or even a large bin will keep it protected and ready for the next trip.
Think About Your Campsite Before Picking the Right Support
Choosing a support need a bit of common sense:
Hose Length Matters: Think about your sewer hose length, usually 10 to 20 feet is common. Make sure your support is long enough to handle your hose like buying the right size extension cord for your tools.
Terrain Check: Consider where you'll be camping. If you're often on nicely leveled RV pads, simpler supports might be fine. If you're boondocking or at more uneven campsites, a more adjustable or robust support can be a lifesaver for getting that consistent downhill slope.
How to Use It - A Quick Run-Through
Using sewer hose support is pretty intuitive:
- Position it: Lay out your support from your RV's sewer outlet to the dump station inlet, creating a gentle downhill slope.
- Place the Hose: Lay your sewer hose into the support channel, making sure it's sitting securely.
- Connect and Secure: Connect your sewer hose to your RV and the dump station, as we discussed earlier. Wear those gloves, and maybe lay down a disposable liner under the connections just in case of any drips.
Pro Tips: Little Things That Make a Big Difference
Angle Down, Always: Emphasize that downhill angle. Gravity is your best friend when it comes to draining waste. A good slope ensures everything moves along without encouragement.
Support it or Regret it: Never, and I mean never, just leave your sewer hose lying unsupported on the ground for a dump. Kinks and splits are just waiting to happen, and trust me, you do not want to deal with a burst sewer hose. Support it every time - it's just part of the routine, like putting on your seatbelt.
Lightweight RV Sewer Hose Support Recommendations
Nobody wants to deal with a saggy sewer hose or a messy leak while emptying tanks. This Kohree RV sewer hose support is the important part that is often overlooked on your camper's. It is so sturdy, simple, and built to make dump day stress-free.
We value every dollar you spend:
- Ready to roll, straight outta the box: No assembly, no fuss. Unfold it, slap it under your hose, and get to work. When you're done? Fold it up, snap the carrying strap, and toss it in storage. Bright orange color means you won't trip over it (or forget it) at the campsite.
- No more "ouch" moments: Deep U-shaped design + steep slope = zero sagging, faster draining. Picture this: Your wastewater zips downhill like it's late for a meeting, while the waste hose stays locked. No leaks, no puddles, no regrets.
- Tough as nails: This camper sewage support is made of heavy-duty PP plastic, it won't crack, bend, or break like cheap plastic supports. The hinges are solid, so it won't give up after a few seasons of rough love.
- Bend it, shape it, dump it: Accordion design lets you adjust the height or snake around obstacles (rocks, roots, your neighbor's bike). Works with any 3-inch hose, up to 15 feet long.

So there you have it - sewer hose supports. Not the most necessary part, maybe, but getting this right is key to keeping your RV trips clean, hassle-free, and less stinky. Get yourself good support, use it every time, and you'll be cruising down the road, knowing one less thing can get messed up.
Macerator Pump: Effortless Waste Management
Think of a macerator pump as like a garbage disposal but for your black water system. Instead of just letting gravity do all the work, this little gadget steps in to chop up the waste and pump it out. It's not essential for every RVer, but for some situations, it can be a real game-changer. Let's break down why and when you might want one.
Just like with most RV gear, you've got a few choices here:
Built-in Macerators: These are installed directly into your RV's plumbing system. Think of them like a permanently installed appliance, right there whenever you need it. A popular example is the SeaLand SaniCon system. It's always ready to go, which is convenient if you know you'll use a macerator pump often.
Portable Macerators: These are standalone units that you hook up when you need them and then store away. Similar to the Kohree 12V 12GPM RV macerator pump kit, this kit includes all necessary components for wastewater cleanup, eliminating the need for additional expenses. Think of these as the 'take-it-with-you' option. Great if you only need a macerator occasionally, or if you want to be able to move it between different RVs down the line.
How to Choose the Right Macerator Pump?
Picking the right macerator pump is about matching it to your needs:
Tank Compatibility: Consider your black water tank size. Most macerator pumps are designed to handle tanks from about 30 gallons upwards - some even 50 gallons and more. Make sure the pump you choose is rated for your tank size, like matching the engine power to the size of a truck you need to pull.
Noise Levels: Macerator pumps do make some noise when they're running - it's a motor grinding things up. Some are quieter than others. If you're sensitive to noise, or often camp in quiet spots, check the noise ratings if available. Think of it like choosing between a loud construction site generator and a quieter camping generator.
Power Needs: Electric macerator pumps draw power from your RV's battery. Check the power requirements, especially if you do a lot of dry camping. You want to make sure your battery bank can handle the draw, like checking if your car battery can handle running all the accessories on a cold night.
How to Use a Macerator Pump?
Using a macerator pump is generally pretty straightforward, but here's the gist for a remote dump station setup (which is where they really shine):
- Set Up Hoses: Connect your sewer hose to the macerator pump outlet. These pumps can often push waste further and even uphill a bit, so you can reach dump points that are not directly below your RV outlet.
- Power Up: If it's an electric model, connect it to your RV's 12V power source. Portable models often clamp onto your battery.
- Position the Outlet Hose: Run the outlet hose to the dump station inlet - even if it's a little further away or slightly uphill.
- Open the Valves & Pump: Open your black tank valve, and turn on the macerator pump (if electric). The pump will grind up the waste and push it through the hose to the dump station.
- Monitor and Flush: Keep an eye on the process, and once the tank is empty, flush the system with clean water, as mentioned earlier, to clean out the pump and hoses.
A Handy Helper for Waste Disposal Recommended
If you want to prevent clogs in your curved drain pipes or ensure smoother black water tank emptying in your RV, then this Kohree macerator pump will be a valuable tool. Let's explore its impressive features:
- Power that doesn't quit: This 12V beast chews through waste like a woodchipper. 12 gallons per minute means a 150L tank empties in 4 minutes flat - faster than you drink a cup of coffee. And it'll pump uphill up to 10 feet, so no more repositioning your rig for that awkwardly placed dump station.
- Quiet, clean, and clog-proof: Twin spiral blades with SK5 steel grind everything to confetti (1/16" bits max). No more clogs from unexpected debris. Plus, the motor's quieter than your AC and smart enough to shut off if it overheats or runs dry.
- Everything's in the box: Pump, hoses, clamps, gloves, even a screwdriver for manual cleanouts. Toss it all in the included storage case, and you're ready for anything.

If you find yourself in situations where gravity dumping is a pain, or you need to extend your dumping reach, they can be a fantastic piece of kit. They add a bit of convenience and flexibility to waste management, letting you focus more on the open road.
RV Portable Toilet: Compact Sanitation Solutions
RV portable toilets are like your own personal restroom you can take anywhere, especially useful in small RVs or when camping off-grid without amenities. They handle waste in a self-contained way, storing it until you can empty it at a dump station.

There are two main types, each with its charm, like choosing between a sedan, SUV, or hybrid for a road trip:
Cassette Toilets: Feature a removable waste tank that can be easily detached for emptying. Ideal for small RVs with built-in compartments for tank storage.
Pros: Larger capacity, integrated design.
Cons: Heavier when full.

All-in-One Portable Units: Compact, self-contained systems designed for easy transport. Popular for boondocking due to their lightweight, standalone design.
Pros: No installation required.
Cons: Some models have smaller tanks that require frequent emptying.

How to Keep It Fresh
Maintaining your portable toilet is like keeping your kitchen sink clean, regular care prevents messes and odors. Here's how:
Emptying and Cleaning the Waste Tank: Most tanks hold 5 to 10 gallons, enough for a few days for one or two people. Empty the tank when 2/3 is full to avoid spills. Use designated dump stations or RV sewer hookups. Rinse with water and a mild cleaner (e.g., diluted bleach or RV-specific solutions) after each use.
Sealing Valves to Prevent Odors: Ensure all valves are tight, like closing the lid on a smelly container to keep the kitchen odor-free. Apply silicone lubricant to seals periodically to maintain integrity. This prevents leaks and keeps your RV smelling fresh.
Choosing the Right Toilet that Fit for Your Needs
Picking the right portable toilet is like choosing the right size suitcase for a trip. Consider these factors:
Capacity (5-10 Gallons): It depends on how many are using it and for how long. A 5-gallon tank suits weekend trips while 10 gallons works for longer stays.
Weight: If you're moving the RV a lot or carrying the toilet, a lighter is better, like choosing a lightweight backpack over a heavy one. Cassette toilets might be heavier due to the tank, while all-in-one units can be lighter if made of plastic.
Features: Find a model with a level indicator. A level indicator is like a fuel gauge on your car, telling you when it's time to empty, so you don't get caught off guard.
Pro Tips for Hassle-Free Use
Here are some handy tips, like life hacks for your RV:
Pre-Treat the Tank: Add a small amount of water and eco-friendly chemicals before use to prevent waste from sticking.
Storage: Keep the toilet horizontal to maintain valve seals and prevent leaks.
Go Green: Opt for septic-safe chemicals to protect ecosystems and onboard systems.
Solid & Portable RV Porta Potty Recommend
Alright folks, if you're in the market for a no-nonsense portable toilet for your camper, boat, or even just for those times when you're properly off-grid, let me tell you, this Kohree portable potty ticks those boxes pretty darn well.
- Built like a tank: First off, it's built to last just like you'd want it. It holds up to 440 pounds, which, unless you're hauling around linebackers, you're gonna be just fine. And despite being solid, it's genuinely easy to tote around. Dimensions are about 14 and a bit inches each way - that's a decent adult-sized seat, but still compact enough to stash in your rig without taking over the whole darn place. Got a handle too, so lugging it from the car to the campsite is no sweat.
- Enjoy a "Set It & Forget It" Capacity: Got a weekend trip? A month-long boondock? No sweat. The 5.8-gallon waste tank means fewer dump stops, while the 3.2-gallon freshwater tank provides up to 90 times flushes. A convenient level indicator allows for quick visual checks, so you'll always know when it's time to empty the tank.
- Zero Stink and Zero Spills Promise: Now, nobody wants a stinky camper, right? Kohree's got this covered with a design that's all about being odorless and leak-proof. We use a high-density plastic and a sealant valve to lock things up tight. And emptying it? Sounds pretty slick too. We've got this rotating spout thingy so you can pour without splashin' it all over.
- 60-Second Toilet Refresh: Scrubbing those awkward nooks is nobody's favorite chore. That's why we've engineered two smart solutions: a T-shaped water nozzle delivers full 360-degree wash coverage, while our precision sprayer targets hidden corners. Finally, there are no more lingering streaks or stubborn stains.

If you're serious about comfort and convenience on the road, Kohree's a no-brainer. It's rugged, stupid-easy to use, and keeps your camper smelling like a pine forest instead of a porta-john. Plus, less dumping = more time for campfires.
Portable toilets are a game-changer for boondocking and small RV living, offering flexibility and hygiene on the road. By selecting the right model, maintaining it properly, and prioritizing eco-friendly practices, you can enjoy off-grid adventures with confidence.
Interactions Between the RV Water Systems
Managing your RV's water systems is a delicate experience, especially during off-grid adventures. Freshwater usage directly impacts gray (sink/shower wastewater) and black (toilet waste) tank levels, requiring careful planning to avoid overflows or shortages. Here's how to balance these systems and stay ahead of your needs.
- Fresh In, Gray & Black Out: When you use fresh water in your shower or sinks, it becomes gray water and goes into the gray water tank. When you flush the toilet, that freshwater becomes black water and heads to the black tank. It's a direct chain reaction, just like when you pour water into a glass, eventually, it's gonna fill up and maybe overflow if you're not careful.
- Tank Levels: This means your fresh water usage directly impacts how quickly your gray and black tanks fill up. Use more fresh water, and those waste tanks are going to get full faster. It's like a seesaw - as your freshwater level goes down, your gray and black levels go up. You gotta keep an eye on all three.
- Trip Planning: This is where trip planning comes in. You can't just think about how much fresh water you'll need. You also gotta think about where and when you'll be able to dump those gray and black tanks. It's all part of the RVing equation. Running out of fresh water is a pain, sure, but having overflowing waste tanks? Trust me, you really want to avoid that.
So, keep an eye on all those tank levels, plan for refills and dump stops, and you'll be smooth sailing.
FAQ Section: Break Down Your Concern
How often should I empty my gray and black water tanks?
Black Tank: Empty when it's 2/3 - 3/4 full (prevents clogs and odors).
Gray Tank: Empty when full, but avoid letting food debris sit (to prevent smells).
Pro Tip: Dump the black tank first, then the gray tank to rinse the hose.
Why does my RV smell like sewage?
Common causes: Full or improperly vented black/gray tanks.
Dry tank seals (lubricate with RV-safe sealant).
Lack of tank treatments (use enzyme-based chemicals).
Pro Tip: Keep the black tank valve closed until dumping to maintain a liquid seal.
Can I use regular toilet paper in my RV?
No! Use only RV-specific toilet paper (it dissolves quickly to prevent clogs). Test regular TP by shaking it in a water bottle - if it doesn't break apart, avoid it.
How do I winterize my RV water system?
Drain all tanks and water lines.
Blow out pipes with compressed air or use antifreeze made for RVs.
Bypass the water heater to protect it from damage.
What's the difference between gray water and black water?
Gray Water: From sinks/showers (non-toxic but can harbor bacteria).
Black Water: Contains toilet waste (hazardous, requires careful disposal).
Never dump gray or black water illegally, please use designated stations!
How do I know when my tanks are full?
Most RVs have tank-level sensors (check your control panel).
Signs of a full black tank: Slow toilet drainage, gurgling sounds.
Signs of a full gray tank: Slow-draining sinks or showers.
Can I drink water directly from my fresh tank?
Only if the tank is sanitized and you use a water filter. Always filter or boil water from unknown sources (e.g., campground hookups).
What's a macerator pump, and do I need one?
Grinds waste into slurry for easier disposal (useful for uphill or distant dump stations). It is ideal for smaller RVs or boondocking setups.
Conclusion
Understanding your RV's water systems is the key to comfortable, sustainable travel. Whether you're boondocking in the wilderness or parked at a campground. By balancing freshwater usage, tracking gray and black tank levels, and planning strategic dump station stops, you'll avoid messy overflows and extend your off-grid freedom.
What's your best tip for managing RV water systems? Help fellow beginners by sharing your advice in the comments below! Please don't forget to bookmark this guide for your next trip, and subscribe for more tips to master RV living.
- Choosing a selection results in a full page refresh.